Connect your first account
This page connects one mail account to email-mcp, in the browser or without a browser. You need your email address, and the password or the app password of the account. An app password is a separate password for one program. The section App passwords says more.
If your computer has no keychain
The first command makes your master key (the key that protects your stored
passwords). By default, it keeps the key in the keychain (the password store of
your operating system). A computer with no keychain, such as WSL (Windows
Subsystem for Linux) or a server that you reach over SSH (Secure Shell: a way to
log in to another computer over a network), stops with an error about the
keychain. On such a computer, set the environment variable EMAIL_MCP_KEK (a
named setting that a program reads from its surroundings) to a key file before
the first command. The first command then makes the file. The folder of the
path must exist, and the path is an example:
export EMAIL_MCP_KEK=file:/home/you/.email-mcp.key
Use the same value in the config of your AI app later. The page The master key says more about the key file.
In the browser
Sign in to the web pages
Run this in a terminal (a window where you type commands). The command starts the local web pages of email-mcp (pages that email-mcp shows in your browser, from your own computer) and signs your browser in to them:
email-mcp setup
It prints a link and opens it in your browser. The link starts with
http://email-mcp.localhost: and works once, for 10 minutes. It signs your
browser in to the local web pages of email-mcp, which run at
email-mcp.localhost (a name that Chrome, Edge and Firefox send to your own
computer). The sign-in lasts 24 hours, and it ends sooner after 2 hours without
use. Run email-mcp setup again to sign in again.
The command keeps running. Keep this terminal open, and open a second terminal
for any other command. The terminal also shows log lines, such as
time=... level=INFO msg=.... They are the log of email-mcp. Lines with
level=INFO are normal.
Your browser then shows the Accounts page. With no account yet, the page has the button Connect your first account. If an account exists already, your browser shows Waiting for you first. Click Accounts in the menu.

If your browser does not find the link, see If your browser does not find email-mcp.localhost.
Add the account
Do these steps in the browser. Each button name is written as the page shows it.
-
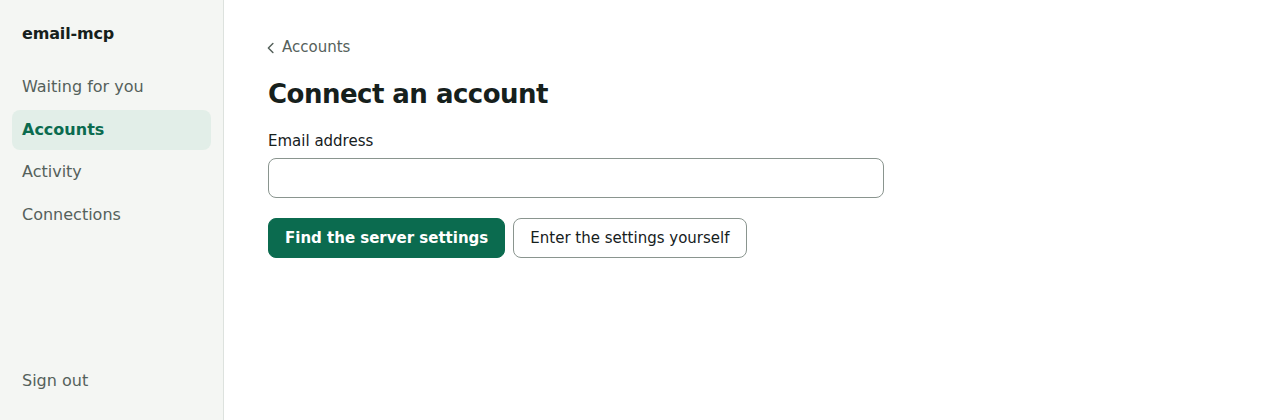
Click Connect account. With no account yet, the page also has the button Connect your first account. Both open the same page, Connect an account.
-
Type your email address and click Find the server settings. email-mcp looks up the IMAP (Internet Message Access Protocol: the protocol for reading mail) and SMTP (Simple Mail Transfer Protocol: the protocol for sending mail) servers of your provider. It sends only the domain of your address (the part after
@) over the network, and it tests nothing yet. The domain goes to three places:- the database of Thunderbird, the mail program of Mozilla. It is a public list of the settings of mail providers;
- the autoconfig server of the domain. This is the server
autoconfig.and your domain, where a provider can publish its settings; - DNS (Domain Name System), the service that finds the servers of a name.
You can also click Enter the settings yourself.
-
If the page says that no server settings were found, click Enter the settings yourself, and go on with the form below. Otherwise, check the suggestion. The page warns that the settings are only suggestions. Check that each host name (the name of a server, such as
imap.example.com) belongs to your mail provider, because your password is sent to the servers that you choose. Then click Use these settings. If the page lists more than one suggestion, each one has its own button Use these settings.If you enter the settings yourself, type the Server, the Port and the Security of the incoming mail (IMAP) and of the outgoing mail (SMTP). The form starts with port 993 for IMAP and port 465 for SMTP, both with TLS (Transport Layer Security: it encrypts the connection from the first byte). STARTTLS is for servers that start plain and then switch on encryption (ports 143 and 587).
The Security list has a third choice: “None: not encrypted, only for a server on this computer”. Choose it only for a server on your own computer, such as a local bridge. After you click Test the connection and save, the page shows the section No encryption, with this warning:
Without encryption, your password and your messages travel as plain text. Anyone who can read the connection can read them. Use it only for a server on this computer, such as a local bridge.
Tick the box “I understand that this connection is not encrypted: my password and my messages travel over it as plain text.”, type the password again, and click Test the connection and save again.
-
Check the User name. The page fills in your email address. Some providers use another user name. If your provider gave you another one, type it.
-
Type your password or app password in the field Password or app password (see App passwords). The page never keeps the password, so type it again each time you test.
-
Click Test the connection and save. The account is saved only when the test passes. The page then shows Accounts. The account has the status Connected and the mail level Send.
If the test fails, the page says why, and it saves nothing. For example: “The server refused the user name or the password. Some providers need an app password, or IMAP access turned on in their settings.” For more help, see Troubleshooting.
-
If the page shows the section Certificates, a server showed a certificate (the proof of identity that a server shows) that your computer does not trust, and nothing was saved. The page says this at the top: “A server showed a certificate that this computer does not trust. Nothing was saved.” The section Certificates is at the bottom of the form, under the password field, so scroll down. Read the SHA-256 (Secure Hash Algorithm with 256 bits) fingerprint (a short, unique code of the certificate) and check it with your provider or with your local bridge (see A local bridge). To go on, tick the box of each server. It reads Trust this certificate for the IMAP server, or for the SMTP server, then the host name. Then type the password again, and click Test the connection and save again.
For a certificate that no known authority signed, the page also says: “Trust it only if you expect it.” A server that is not on your own computer also needs the box I understand the risk. If your provider gave you no fingerprint, do not tick the boxes for such a server. The page shows this warning with the box:
A server that is not on this computer should have a certificate that an authority signed. A certificate that no authority signed can mean that someone on the network reads your mail and your password. Trust it only if your provider gave you this fingerprint.
If the page says “This certificate cannot be trusted here.”, it has no box to trust the certificate, and you cannot go on with this server. A certificate for another host name, or one that has expired or is not valid yet, is never accepted.

App passwords
Many providers (for example Google, Microsoft, iCloud and Fastmail) need an app password: a separate password that you make in the security settings of your mail account. Type the app password where the page asks for the password. Some providers also need IMAP access turned on in their settings.
If your browser does not find email-mcp.localhost
Chrome, Edge and Firefox find email-mcp.localhost by themselves. If your
browser does not find it, use one of those browsers, or add this line to your
hosts file (the file where your computer keeps names and their addresses;
/etc/hosts on macOS and Linux, C:\Windows\System32\drivers\etc\hosts on
Windows):
127.0.0.1 email-mcp.localhost
email-mcp setup also prints the address of a page on 127.0.0.1 (the address
of your own computer) that says the same. You cannot sign in on 127.0.0.1
itself (see the Security page).
The command opens your browser through a private temporary file, so the link
with its one-time token (a secret code) is not in the list of running programs.
If your computer opens .html files in another program, or a sandboxed
browser (a browser that runs with limits on what it can reach) cannot read the
file, open the printed link yourself. The command reminds you of this.
Stop setup when you are done
The pages run until you press Ctrl-C (hold the Ctrl key and press C) in the
terminal. Stop setup when you are done. The web pages close with it. To open
them again later, run email-mcp setup again (see Open the pages
again).
A local bridge
A local bridge (a program on your own computer that offers IMAP and SMTP servers for a mail service), such as Proton Mail Bridge, uses a certificate that no known authority signed. An authority is an organization that your computer trusts to sign certificates. email-mcp then shows the SHA-256 fingerprint of the certificate (a short, unique code of it). Check it with the bridge, then trust it. email-mcp stores the fingerprint and checks it on every connection. This is called “certificate pinning”. It never turns certificate checks off.
Without a browser
On a computer without a browser, use account add. It reads the password from
the terminal without showing it. The flag --email is the address of the
account:
email-mcp account add --email you@example.com
When the account is saved, the command prints Connected, your address and the
id of the account.
Without --imap-host and --smtp-host, it looks up the server settings and
asks you to confirm them before it sends the password anywhere. On a terminal,
it first prints the suggestions, one on each line, and then the lines “The
password goes only to the servers that you choose. Choose them only if you know
these hosts.”
- With one suggestion, the question is
Send the password to these servers? [y/N]. - With more than one suggestion, the question is
Choose the settings to use [1-3], or press Enter to stop:. The number after1-is the number of suggestions (3 is an example). Type the number of the suggestion that you want.
If you press Enter, or you answer in another way, the command prints “account add: stopped. Nothing was saved.”
Without a terminal (for example, when a pipe gives it the password), nobody can answer. The command then prints the suggestions and stops, and it saves nothing. It says: “account add: suggested settings need a confirmation, and without a terminal nobody can confirm them. Run again with –imap-host and –smtp-host to choose the servers that get the password.”
With the flags, it uses your settings. The flag --imap-host is your IMAP
server, and --smtp-host is your SMTP server. A flag is an option that starts
with --:
email-mcp account add --email you@example.com \
  --imap-host imap.example.com --smtp-host smtp.example.com
The default security is tls (encrypted from the first byte) on ports 993
(IMAP) and 465 (SMTP). Use --imap-security starttls or
--smtp-security starttls for servers that start plain and then switch on
encryption (ports 143 and 587). Run email-mcp account add -h to see every
flag.
These flags change the other settings:
--usernameis the user name of both servers. The default is your email address.--imap-portand--smtp-portare the ports.--trust-fingerprintand--accept-remote-certificatetrust a certificate (see below).--plaintext-i-understandallows a connection without encryption to a server on your own computer.
A certificate that your computer does not trust
If a server shows a certificate that your computer does not trust, account add
prints the server, the SHA-256 fingerprint and the problem. This is what it
prints when standard input is not a terminal (for example, when a pipe gives it
the password), for a certificate that no known authority signed, such as the
certificate of a local bridge. In this case it saves nothing. The ports and the
fingerprint are examples:
The IMAP server 127.0.0.1:1143 showed a certificate that this computer does not trust.
  SHA-256 fingerprint: 4D:A3:10:91:C8:32:0D:7E:82:31:C1:57:4C:46:66:10:C7:B4:43:DE:4E:33:F9:8D:9B:61:44:12:FB:F3:9B:FC
  No authority that this computer trusts signed this certificate. A local bridge (such as Proton Mail Bridge) uses such a certificate. Trust it only if you expect it.
account add: the certificate of the IMAP server 127.0.0.1:1143 is not trusted. Nothing was saved.
account add: Before you trust a certificate, check its fingerprint with your mail provider, or with the program that runs the server, through a channel other than this connection. Then, to trust it without a terminal, run again with --trust-fingerprint 4da31091c8320d7e8231c1574c466610c7b443de4e33f98d9b614412fbf39bfc.
Check the fingerprint with your mail provider, or with the program that runs the server, through another channel. Then trust the certificate in one of two ways:
- On a terminal, the command asks
Trust this certificate? [y/N]. Answery. For a server that is not on your own computer, it also asksTrust the certificate of HOST anyway? Type yes to continue:(HOST is the name of the server), and you typeyes. - Without a terminal, run the command again with
--trust-fingerprintand the value that the program printed. Repeat the flag for the second server. For a server that is not on your own computer, also give--accept-remote-certificate.
If the program says “This certificate cannot be trusted here.”, it does not offer to trust the certificate.